Friday, 20 December 2013

Strengths, Weaknesses, Opportunities and Threats

Strengths
  • Using a range of camera angles
  • Having the scenes mapped out in my head before starting

Weaknesses
  • Not planning ahead with plain creation, causing the animation to be slightly robotic
  • Not using a wide range of lights
  • Not linking each scene together to create a fluid scene change 
  • Limited textures on my models 

Opportunities
  • Learnt how to create a glow effect 
  • Learnt how to create a explosion of polygons with a mesh

Threats
  • Not having time to create new models
  • Not having all the knowledge to create the effects that I desired

Thursday, 19 December 2013

scene 9 and final animation

Again like scene 8 there is a lot of things happening in this one scene that is why there is only a simple omni light used within the scene. The models and camera again are following a path that I created, also the x-wings wobble again but also darth vders ship spins out of control when a tie fighter hits in to it. I chose this high up camera angle to show all the aspects of the scene, the camera then gets closer to darth vaders ship as it is about to be hit then it follows it as it is spinning out of control. I chose this as it represents what happens within the movie scene but with time constraints I could not create the millennium falcon that is used in the real movie scene. 


Final animation 

This is my final 30 second animation that I have created and put together with windows movie maker.


Tuesday, 17 December 2013

scenes 7 and 8

Within scene 7 I have used an omni light again but I decided to try the inverse square decay option within its modifier tab, this allowed me to control how far the light would travel and at what intercity. The model and the camera are again following a path created to provided them with forward motion within the scene, also by using fey frames I have animated the models and camera to act as if there was turbulence so they wobble around. I chose this camera angle as it provided me with the best representation of the tie fighters and darth vader being right behind the x-wings and are ready to attack.


scene 8 
Within scene 8 I decided to revert back to using a simple omni light as I did not get the required affect that I wanted from the previous scene. The models and the camera again are following a path that I created to give a sense of movement in the scene, also the x-wings wobble during the scene to create the idea that they are under attack. I have also included lasers that follow a path and hit one of the x-wings but there is not an explosion affect as it was to time consuming to implement. I also used the bomb modifier effect to simulate one of the x-wings crashing in to a wall. 
  The camera angles that occur in this scene where actually created by accident when I was testing where I should put the cameras key frame to end on its path, even though this came about by accident I believe that it is still impact-full as it follows the laser to its target then the camera shows the tie fighters casing and the x-wing crash then the camera reverts back to the x-wings fleeing all within one scene.   


Sunday, 15 December 2013

scene 5 and 6

Within this scene again I have used a simple omni light to light up the scene, the camera I am used was a target camera but it was not moving down a spline like in previous scenes. I chose to used this type of camera because it allowed me to get the affect that you are the guns tracking the ships as they pass. The x-wings simply follow down a sight spline to emphasis the speed. I chose this camera angle as it was used in a similr way within the movie to show the tie fighters chasing the x-wings which can be seen in scene 6. 


scene 6 


Scene 6 is a replica of scene 5 apart from the models that are used, this is because I wanted the exact same affect that I created with scene 5. This camera angle was used again because I wanted to seem as if the tie fighters and darth vader was following the x-wings exact moves.


Thursday, 12 December 2013

Scene 3 and 4

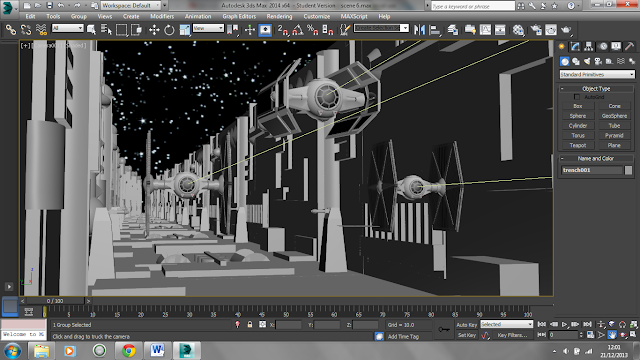
In preparation for the following scenes within my animation I had to create a section of the death star trench that I could copy to create a small representation death star trench without create the whole thing. 

Within my 3rd scene I also used an omni light because there was no need for special light effects again, this though I have used a target camera that track the middle x-wing and travels down a spline as if it was traveling with the x-wings. 
  I chose this camera angle as it present the x-wing as a dominate aspect of the scene as they are about to enter the death star trench on a mission to destroy it. 


scene 4
This scene is very similar to scene 3 as they are both portraying ships entering the death star trench but for different reasons. This scene also only uses an omni light to illuminate the whole scene because there was no need to have different lighting. 
 I chose this camera angle as it shows the dominance of the tie fighters and darth vader within the scene but for a different reason then why the x-wings where dominate, the tie fighters are seen as dominate in this scene because they are stalking the x-wings in to the trench to go and destroy them.  


Tuesday, 10 December 2013

Engine glow research and scene 2


This video enabled will enable me to create a engine glow effect on my x-wings and also if I decide to create any lasers then I could also use this technique. This video does not just give a tutorial on how to create a glow but that was the only aspect in which I will be using in future scenes.

Scene 2

Within scene 2 I only used an omni light withing the scene as there was no need for fancy lighting effects as it was more about the actions and camera angles that would create emotions. The x-wings within this scene are simply traveling down a straight spline towards the death star, but also the ships become smaller the closer they get to the death star to show there speed but also to show how big the death star is in comparison.
   
The camera also has an animation that gives the effect of the x-wings passing a speed and causes the camera to shake. I have used this camera angle because it empathizes the size difference and speed difference between the x-wings and the death star which I feel is what the scene from the movie creates as well.


Friday, 6 December 2013

Reaction manager


Reaction manager allows you to animate two objects at the same time with the same reactant, this allows you to create a sliding door effect when a character walks up to it. When creating my scenes I will not be using this technique as I do not need objects to react with each other, and the animation that I do require can be performed by key frame animation.   

Tuesday, 3 December 2013

Scene 1


This is my first scene that I have created, as you can see there are a lot of lighting and other aspects of the scene. Firstly the lighting, I have used multiple target spot lights to create the effect of a sun shining on to the planet of Hoth. Also within the scene I have used omni lights close to the 3 x - wings to keep them illuminated throughout the scene. I used a target camera that is stationary that tracts the middle x-wing, I chose this camera angle because it best represented my take on the scene of the x-wings leaving Hoth within the movie.
You may notice within the animation below that the x-wings become darker when they pass the camera where the metaphorical sun would be, this is to give the affect that the camera is actually a solid object that is watching the event and causes the light to be blocked. 

Saturday, 30 November 2013

Rigging and skinning

Rigging is the process in which you create bones within a scene and then animate them to bend in a certain direction. This process is used in all character animations as it creates the skeleton of each character and allows them to move in a lifelike fashion, this can also be used to exaggerated features within cartoons such as a hammer hitting an object and rippling. 


Skinning this the process in which you add a mesh to the rigging that has been created, in this case a cylinder to these 4 bones. This is how the characters will get there appearance in the scene. There are problems that can arise from doing this as if there are to few vertexes at the bend points it can cause conflicts between each bone and also can create z fighting where both textures on each bone are fighting for the same area to display.

I have chosen not to use these techniques within my animation scene as I do not have any characters within it and also I do not wish to exaggerate any aspect of my scene but this could come in useful later on when creating other games that could require character animation. 

Friday, 22 November 2013

Key frame animation


key frame animation
This technique allows you to create animations within a set number of frames, this means that the object can be manipulated at different frames to give it a more fluid and natural motion. 
With this technique i will be able to animation the ships to wobble while they are flying to give the effect that they are being driven by real people. 

Spline motion
This is a new technique will allow me to animation my ships along a line so they will have forward movement with the ability to turn and bank when required within the scene. this technique will be the most useful as I will require my ships to have forward momentum and also encounter sideways movement, this is key to provide a realistic movement that a space ship would encounter.  


This technique can not only be used on objects or models, but it can also be used to have a camera tracking a model as if it was one of the model or it could create the effect that it is chasing the model. e.g tie fighter chasing x-wing.

Friday, 15 November 2013

Animation in action

week 7

This week we watch a Pixar animation called "One man band", this gave use the first insight in to animation and camera selections in professional work. This taught me how multiple elements of camera angles and processes can come together to create a realistic scene.

Link:
http://vimeo.com/19621692

Thursday, 7 November 2013

Completed X-wing

X-wing


Techniques used and why
The techniques I have used within this model are nearly exactly the same as the too previous models, One major difference is with this model I tried to use the least amount of extra boxes and other shapes to create the entire model. The first technique I used was the extrude tool this allowed me to create the fuselage of the ship with a box, I also then created and manipulated edges and vertexes to create the final shape, I used this a it was the best way to enlarge the box with straight angles rather then curved ones. I also used bevel to create the engine, I used this technique because it was the simplest way to create cone shaped objects with out creating a cone. 

There is limited detail on this model now but there will be more add before the animation via textures, this should make the model less boring. This model will not be close up the the camera at low speeds so does not require a huge amount of detail anyway.   

Saturday, 2 November 2013

Completed Darth vader tie fighter

Darth vaders tie fighter


Techniques used and why 
The techniques I used within the process of creating this model was almost exactly the same as when creating my tie fighter. As you can see I used the same center sphere as my tie fighter because they are very similar and this help save time on redoing it again, I did make small changes that where there where no similarities. I used bevel again that allowed me to create shapes that where angled such as the inside of the wing, I used this technique as it was the fastest and most precise of the two techniques I know that would create this shape. The other technique that I could have used is inset and then drag the smaller polygon in the direction required. Another technique I used was extrude, this allowed me to create depth within the model, I used this because it was the best tool to create definable depth without there being a curve present. As seen in the photo I also used the visual editing studio to line up the different aspects of the ship, this time however I did not size the picture correctly so I had to roughly line the shapes up which may have caused some problems. 

There is not much detail in the model as I will be adding in textures later on before the animation is complete to add more detail, also high detail is not required for my animation as there will be no close ups of this ship.  

Saturday, 26 October 2013

Completed tie fighter


Tie Fighter


Techniques used and why
When creating this 3D model I used multiple techniques I have learnt over the period of the 3 weeks previous to completing this model. As you can see I used the virtual editing studio technique to get the correct size of the model, this help me get the correct shapes and sizes of the body and wings so that they are proportionate to each other. I have also used bevel multiple times to create the window and the engine cover, this allowed me to create cone shaped object with out having to use a cone then delete polygons. When creating this model  I also used extrude a lot to create precise shapes that can only be replicated by spending time precisely lining up a separate shape the the original. Another tool i used in creating this model was the spline tool that allowed me to draw shapes that I could not create with normal standard shapes, I used this a is was the fastest method to create the complex shapes I required.

The model may seem simple and does not have a huge amount of detail on them but this will change when it comes to adding this in to the animation as I will be creating textures using the unwrap uvw and photo shop, this should add more detail. Also I decided not to add detail because I plan on not using slow close up camera angles where the detail would be required.   

Tuesday, 22 October 2013

Storyboard

Scene 1
x-wings leave home planet

scene 2
x-wings head towards death star

scene 3
x-wings dive in to death star trench

scene 4

x-wings in tench from different angle/angles

scene 5
tie fighters enter trench behind  x-wings

scene 6

tie fighters pursuing x-wings

scene 7

tie fighters shoot 1 x-wing down

scene 8
tie fighters shoot another x-wing down

scene 9
millennium falcon saves last x-wing

scene 10 
 darth vader spins out of control


Tuesday, 15 October 2013

Using boolean to cut out shapes


This is me learning the tools on how to create and cut out shapes from each other using the boolean tool on 3ds max. To find this functionality on 3ds max, I fount rather confusing as its in a menu that I have never used prior to this.
I fount that this function is only really needed to either create a shape within a shape or create a complex shape with 2 shapes rather then with multiple shapes that could cause there to be more polygons.
Overall I feel that this is an easy technique to use within 3ds max its just remembering where the function can be accessed which is my problem.  

Another tool that I have recently learnt about is the align tool, this allows you to perfectly align shapes without spending too much time doing it by hand. 
This is the final product of aligning 4 different shapes on top of each other. I fount this technique rather easy to use as the tool selection is clear and easy to remember. Also the techniques used to create this effect are easy so long as I was to only do each axis movement by its self otherwise I was making mistakes. 

The final technique is creating 3d shapes from 2d drawings, this will help create complex shapes that possible cant be made with 3d shapes or can be used to create floor plans for buildings. 

This is the final product of this technique, as you can see this shape could not be created be the simple shapes that are given to you in 3ds max. I fount this technique extremely simple to use and it will allow me to create complex shapes that may be required when creating models in the future. 

On a final note I would like to learn how to concave shapes in order to create a radar dish for the millenium falcon model I will be creating.  

As stated before in this blog I have learnt though self teaching myself and doing research on how to group shapes together and how to use the inset tool to create windows in my castle model.


Tuesday, 8 October 2013

Week 1 - Thoughts on first techniques learnt

Being a complete novice with 3ds Max  I fought the selecting, moving, rotating and scaling to be very simple as it is very similar to that of Unity. This aloud me to quickly come accustomed to making the first model of a ship steering wheel. Also with the steering wheel being the same all around its circumference the cloning abilities that 3ds Max has to offer help save time on recreating the same shapes that I had already created.

When creating the house I fount the instructions rather difficult to follow, but this could be because of the new techniques that where being used to create the house. To get more familiar with these new techniques I will attempt to implement them within the castle build if its viable to do so, if not I will practice them on a random model.    

Castle Model

This is how I started the castle model I decided to use simple shapes such as rectangles for the walls, cylinders for the towers and cones for the tower roofs. As you can see from the picture I used the connecting and extruding techniques to create the battlements on the surrounding walls. I chose to use these techniques because it gives the best representation of the sort of battlements I wanted, and allows me to either have rectangular battlements or angled battlements if I remove 2 vertex's.


     This is the part of the wall finished with its battlements. I decided that the wall was not long enough so i cloned it and made it larger.


This is a finished out wall without a entrance, to get to this stage I learnt new techniques that helped create effects on the model. One technique is the inset technique this allowed for realistic arrow loops in the towers.

Also to complete the wall I also taught myself how to group objects together, this meant I could group 1 side of the castle wall and clone it to complete all the other sides.


Project research board

Darth Vaders tie fighter 

Tie Fighter 
millenium falcon
X wing 


Y wing

GR-75 Medium transporter